


- Home»
- Garden Room Design Guide
Orangery Design Guide By Lomax & Wood
Introduction
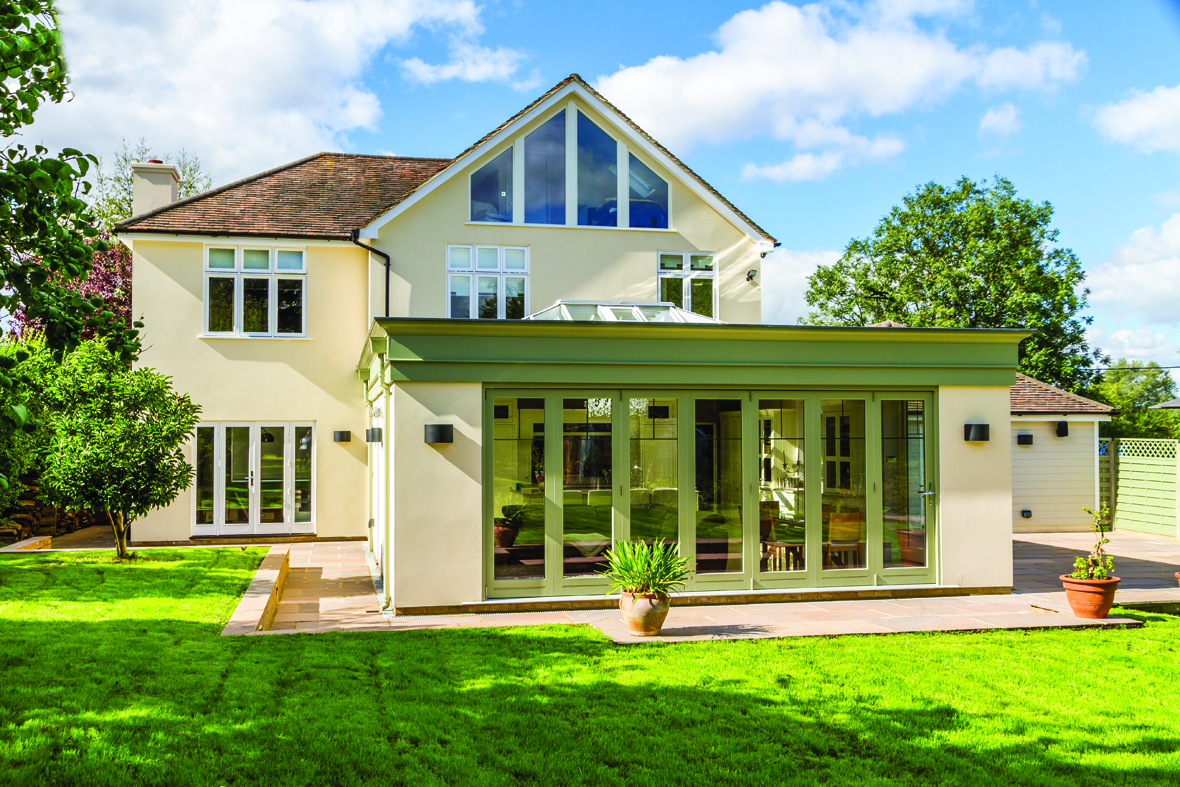
The Orangery or Garden Room is the term for that space in a modern house - commonly an expansion of the kitchen area - which is used for daily activities, relaxing, dining, socialising and family gatherings. It reflects the return of the kitchen becoming the ‘heart of the home’, while at the same time connecting it with the garden (or patio in the case of a townhouse); allowing the outdoors to flow inside and vice-versa.
Very often in new house design and existing house improvements, the Kitchen Garden Room becomes the largest and most used room in the house. It is a Day Room and commonly has a higher level of glazing for the enjoyment of exterior views, as well as a higher level of day lighting through the use of rooflights - enabling enjoyment and awareness of the outdoors, even at times of inclement weather. Much of this glazing would also open, to create a sense of expanding into the garden.
The Garden Room is often a single-storey extension to the rear or side of the house. It may at one time have taken the form of a conservatory, but nowadays for the sake of energy conservation and control of extreme solar heat gain, it could instead have a tiled, pitched roof with a vaulted ceiling and rooflights, or be in the style of an Orangery with a glass lantern rooflight.
An Orangery works particularly well as a garden room in the case of home improvement because its retrospective construction rarely interferes with the first-floor windows of a house and, more importantly, it adds a major architectural feature and focal point to the external elevations of the property. When extending the kitchen of an existing house, for example, a lantern rooflight in the style of an Orangery can introduce natural daylight deep into the spaces at the rear of the enlarged room. More contemporary solutions can also be created with folding or static glass walls.
Lomax + Wood Ltd. are manufacturers of fine bespoke joinery. This Design Guide focuses on the Garden Room created in the classic Orangery style.
The following guidance is aimed at both the individual and the professional. Together with the illustrated examples, it is intended to assist in the planning and designing of an elegant Garden Room building which Lomax + Wood Ltd. have a wealth of expertise in manufacturing and supplying for your project.
Principles of Good Orangery design
The key elements of a well-designed Orangery are proportion, balance, symmetry, sight lines and rhythm. Other important features are also addressed in this Guide.
Proportion and balance
To compensate for what would otherwise look like a disproportionately wide building, choose the highest available ceiling height and with a low base wall height. This will help to contribute to vertical emphasis and balance the proportions of the glazed framework against the width. Choose a nicely proportioned pane size and stick to it for all the doors and window casements or sashes.
A six-brick course base above damp course gives an internal cill height equal to the seat height of a dining chair - just right for perching on or setting down a wine glass.
Imagine how the elevation will look with French doors or folding doors fully open and aim to balance this wide opening with the visual strength of some remaining glazed framework or solid wall. If the design requires panels of solid wall, make sure there is either a greater area of glazed framework, or a greater area of solid wall. Elevations which have an equal area of window and solid wall are not so pleasing to the eye.

A1 The Fryerning
Symmetry
Set the French doors centrally, or if there is to be more than one pair on a wider Garden Room, have the arrangement mirror about the centre-line of the elevation.
Insets and breakfronts
Consider creating an inset or breakfront centrally to strengthen the symmetry. The various purposes of these features include: adding interest; increasing strength and stiffening to resist wind load; reducing continuous runs of fascia, which can potentially look weak and 'wave' out of line; and reducing the need for in-line joints in the cornice or fascia.
Focal points
Unless it is a conservatory that you are designing, there is no need to glaze all sides of the room. Introducing lengths of full-height wall can serve to present pieces of art, to support wall furniture or even to create a fireplace. Enough light will come in through the lantern rooflight to provide equilibrium with this expanse of wall.
In large Garden Rooms, well-placed solid wall panels can also serve to support long spanning steel roof beams. Otherwise, care should be taken to consider where steel posts can occur and still be concealed.
Breaking up runs of glazing with solid walls can offer symmetry and rhythm to the design, while at the same time, providing welcome shade to some areas of the room along with improved thermal insulation.
Sight lines
Where there is a greater extent of window and glazed door joinery it is essential that the glazed pane proportion continues throughout the elements, as aforementioned. It is also essential that the sight-lines run through from one element to the next by: carefully selecting a head rail size common to doors and windows; setting a mid rail on a panelled door to line up with the bottom rail of adjoining windows; and of course ensuring that the glazing bars run through on the same line.
C2 The Marden
Rhythm
By their nature, Orangeries have strong horizontal lines. Balance this with a rhythm of vertical frame members or vertical glazing bars. The use of corner and intermediate pilasters as shown in the examples are excellent for this purpose.
Traditionally, Orangeries had many sets of doors so that orange trees grown in containers could be wheeled out onto the terrace for pollination of the fruit flowers. So, the more pairs of doors, the better. This gives flexibility for furniture layout, which can vary as the seasons change. It does not matter, for example, if a sofa goes across a pair of doors - other means of access can exist and the doors behind the sofa can still be opened out to allow a through flow of fresh air in the summertime.
C1 The Hutton
Bring the garden inside
In the detailing of the Garden Room, the external face of the framework is normally set forward in the thickness of the base walls, as generally the French doors open outwards.
A 20mm setback from the external brick face works best to avoid catching adjoining window cill projections and gives a very deep internal cill board. With strong projection hinges, the French doors can open wide and be tied back with cabin hooks.
In the drawn examples, the 20mm frame setback equals the 20mm thickness of the pilaster features. The outer edge of the corner pilaster will therefore line through with the base brickwork corner, below the framework.
Lantern Rooflights
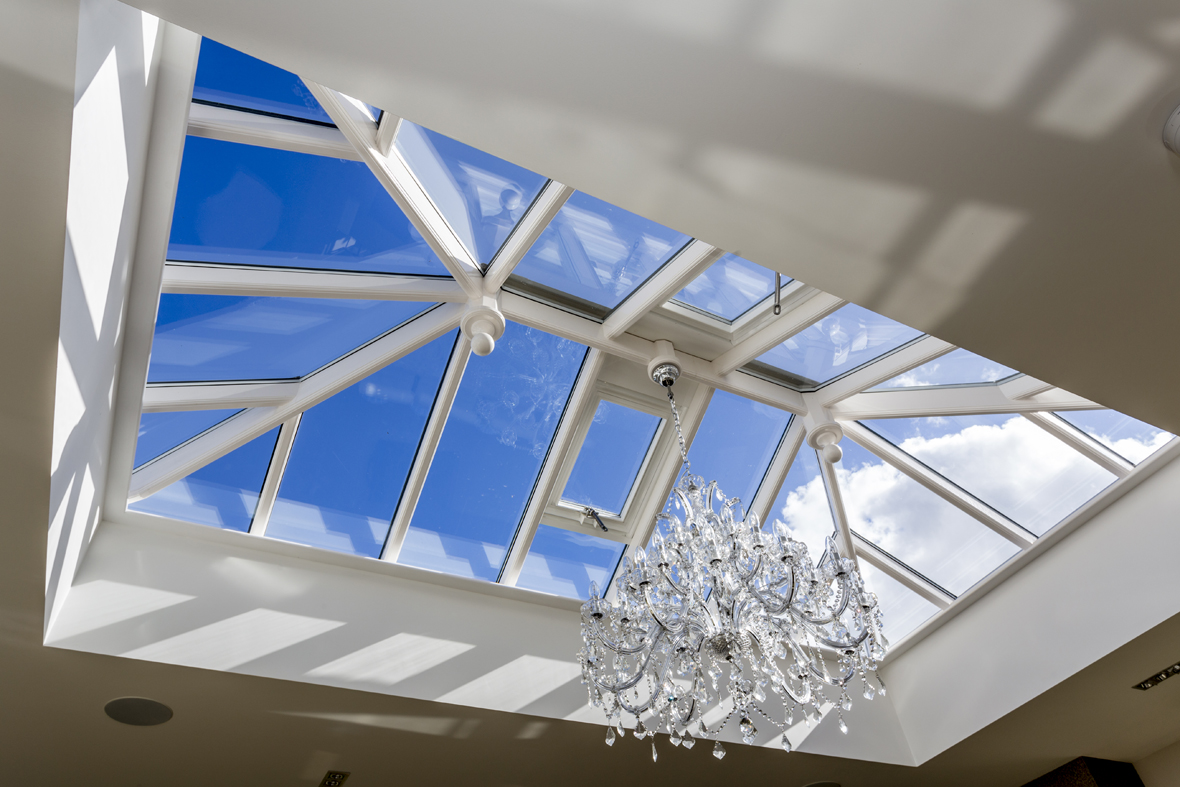
Glass lantern rooflights provide a dramatic feature in a Garden Room; they give excellent day lighting and make an interesting roofscape to a flat-roofed building or extension. They are generally rectangular in plan shape with a hipped structural form and rafters pitched at between 20° for large size lanterns, and 30° on smaller sizes. A 25° pitch generally works well in all applications.
The layout of the rafters look most pleasing spaced at 500mm centres, with an odd number of glass panes (3 or 5) on the shorter side to ensure that only the hip rafters connect to the ridge pins (and not rafters as well, which invariably give a congestion of structure at the ridge pin). The length of the lantern should be sufficient to allow for essential opening vent casements – these enable flies to drift out with rising warm air on hot days and not to gather at the top of an unventilated roof lantern only to eventually expire and drop to below where a dining table may be placed!
Position the lantern in plan so that any of the following criteria are met:
- The lantern is closer to the rear of the roof to best light parts of the room deeper inside the main building;
- There is an even ceiling margin on all sides of the lantern;
- The lantern centres on other features such as, French doors, wall panels, fireplaces, etc;
- In all cases, so that the structural aperture is no less than 450mm from any other external abutment or upstand kerb – in order that a proper job can be made of the roof covering in tight spaces in the first place, and then to be able to gain access all around the lantern for cleaning and maintenance.
Timber rafters are a common choice for the lantern framework as they are less susceptible to producing surface condensation, compared to aluminium for example. Timber provides a natural thermal-break and can be painted any colour to suit the interior colour scheme.
Externally, however, extruded aluminium section rafter bar cappings with glazing gaskets are the ideal materials for low-maintenance weathering. The aluminium cappings always look best powder-coated RAL 7015 lead-grey coloured. White is a suitable alternative if the window and door joinery is also chosen to be in white.
High performance sealed glazing units are recommended for roof lanterns for thermal resistance, sound insulating, security and a clear appearance. Specifications can include: Low-E coatings, solar-reflective coatings, self-cleaning treatment, Argon gas cavity filling, and warm-edge spacers. Standards and Codes call for safety glazing, and inner glazing panes can either be made from toughened glass or laminated glass for extra security; whereas external panes are best only in toughened glass. This is because ‘stepped glazing units’ provide a better weathering detail at the edges, whereby the outer pane of glass over-sails the inner pane to weather the top edge of the upstand kerb. The toughened glass gives a safer edge and reduces the risk to cuts and injury when handling and during maintenance.
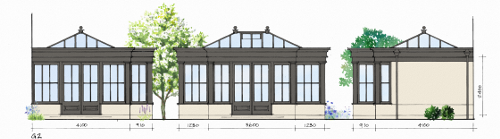
G2 The Highwood
Flat roof surrounds
From a designer’s point of view, one of the great benefits of an Orangery-style Garden Room is the fact that its flat roof form as an extension is the easiest to abut to a main building. This is true in many cases; whether it is a straight wall, it has an inset, or it has to fit into a corner or wrap around one. A lantern-roofed Garden Room can even abut the pitched roof of a single-storey building at eaves level, quite easily.
With reference to the large-scale example roof detail, it is recommended to utilise a ‘warm-deck’ roof construction with a lightweight but high-performing, fully adhered, single-ply polymeric roofing membrane. Such product systems include: Sika Sarnafil; Soprema-Flagon SV; or Danopol FV – all in a lead-grey colour. A warm-deck flat-roof system alleviates the need to cross-ventilate the roof voids which would otherwise pose complications with a rooflight lantern sitting in the middle, effectively interrupting the roof area. Rigid insulation, such as Celotex should be positioned directly beneath the membrane-covered decking. A continuous vapour barrier should then be directly below the insulation (properly sealed at all joints and abutments). Because the insulation and vapour barrier occurs above the roof structure and timber joists, the risk of interstitial condensation in the roof is avoided. This also provides a warm ceiling void to run services, with the freedom of positioning recessed ceiling lights, speakers, etc.
The roofing membrane is adhered to external WPB plywood decking, plywood upstand skirtings at wall abutments and plywood layboards under abutment roof tiles or slates.
Steel roof beams arranged in parallel to trim the rooflight lantern aperture will be necessary and should be designed by a qualified Structural Engineer in each individual case. Most commonly the length of the lantern will run parallel to the rear wall of the house and the primary trimming beams will take the long span – this suggestion avoids point loading onto the main beam in the rear wall of the house, spanning over the wide opening normally occurring between the room being extended and the Orangery extension.
As discussed previously, the object is to give as much ceiling height as possible. The best solution is to run the ceiling level from inside the main building out into the Garden Room extension flush at the same level and uninterrupted by any down-standing roof beams or structure. Where the ceiling height exceeds the height of the windows and/or door frames, the gap can be filled with timber stud framework or multi-timber lintels over the top of the frames which can spread roof joist loading – as shown in the detailed example illustration. Externally, this solution becomes part of the important cornice feature. Alternatively, in cases of Garden Rooms predominantly in masonry construction, proprietary cavity wall lintels and masonry will pass over the window and door openings below the cornice detail, as drawn example B1.
C2 The Blackmore
Cornice fascias - The difference is in the detail
A 'heavy' top cornice feature improves appearance by taking away the boxy-looking top edge of a typical flat-roofed structure and can also stiffen the flat fascia.
As the illustrated detail shows, this can be achieved by using the ply decking material for a coping board which over-sails a deep hardwood ogee-profiled cornice moulding. This is applied to a deep WPB fascia board which can carry rainwater hopper-heads at outlet positions. The Ogee cornice profile is interrupted at these locations to form a roofing membrane-lined 'letter-box' shaped discharge outlet, formed on site, which feeds into the hopper-head.
Where a deeper fascia results from additional framework or lintels above the doors and windows discussed in the preceding item, this is achieved with a second fascia overlapped by the upper fascia; adding more strength to the flatness of the extra deep fascia and making a feature of this with a hardwood drip trim below the edge of the upper board.
Planning and Building Regulations
To build a Garden Room onto an existing building, Planning Permission is often necessary, depending on:
- whether the building is residential or commercial;
- whether the building is multi-occupancy, eg flats or maisonettes
- specifically whereabouts the Garden Room is to be added on;
- its relationship to the principle elevation;
- the size of the extension;
- whether the building is attached to, or detached from, another building;
- the garden plot size;
- whether the building is situated in a Green Belt or on 'Designated land' eg: AONB, National Parks and Heritage Sites;
- or whether the building is Listed, in which case Listed Building Consent is also necessary.
You are advised to seek the advice of a professional, Architect or Surveyor regarding these Regulations.
Provisions in Planning Law can allow single-storey extensions in certain circumstances, such as building a Garden Room onto an individual private dwelling under Permitted Development rules. Such an extension should meet the following common criteria:
- it would be built onto a rear or side wall of 'the original house' (and it can be as wide as the whole width of that original wall);
- it would be a maximum of 4 metres in depth at the rear of a detached house, or 3 metres in the case of a semi-detached house;
- it would be a maximum of 3 metres in height above ground level measured to the top of the flat surround of an orangery, or 4 metres to the ridge of a pitched roof or glass lantern.
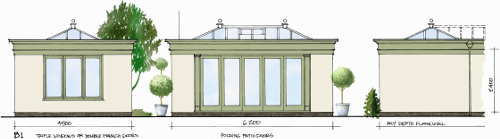
The illustrated design examples A1, B1 and C2 could meet this criteria.
These are known as Class A Permitted Developments and because Planning Law is an ever-changing thing, you are advised to refer to The Planning Portal for current requirements/ restrictions: https://ecab.planningportal.co.uk/uploads/miniguides/conservatories/Conservatory.pdf
Where a proposed Garden Room could be considered to be a 'Permitted Development' it does not need to have Planning Permission. However, one would be strongly advised to seek a Certificate of Proposed Lawful Development from the Local Planning Authority, at a reduced charge, to have this fact established and kept on record for passing on in future.
Compliance with the Building Regulations will generally apply to all Garden Rooms and Orangery extensions, especially where this also involves structural or other alterations to the host building. Again, you are advised to seek the advice of a professional, Architect or Surveyor.
Where the extent of side and roof glazing exceeds a certain percentage of the floor area, whole-house energy consumption (SAP Calculations) will need to be produced by a registered Domestic Energy Assessor to demonstrate compliance with Part L of the Building Regulations: Conservation of Fuel and Power. By having highly-insulated walls, floors, roof and glazing, combined with efficient heating systems and controls, compliance with Part L can easily be met.
When extending buildings, have full regard to the proximity of any shared drains, sewers or other underground services, - and trees.
When building onto a Party Wall, a boundary, or near a building on adjoining land, reference should be made to The Party Wall Act 1996 and as may be later amended.
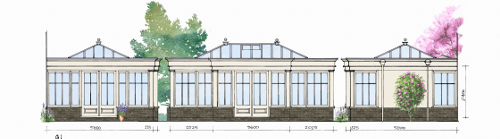
G1 The Kelvedon
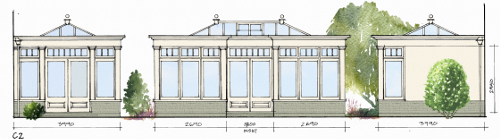
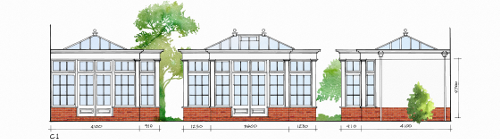
Example design illustrations and details
The accompanying drawings illustrate in detail a variety of six different Garden Rooms or Orangeries. They use a range of three example roof lanterns: L1, L2 and L3.
The examples indicate primary structural roof beams parallel to the rear wall, because Garden Room projects normally incorporate wide spanning openings in rear walls and this will avoid additional point loads on the structure of the main building.
Orangery A1: Small and simple. This could be built on the rear of an existing detached house under Permitted Development Rights, as we have kept the depth to 4 metres.
Orangery B1: Simple, with folding patio doors.
Orangery C1: Similar to G2, with a 6-pane Georgian window option and clerestory lights giving a greater ceiling height.
Orangery C2: Has central doors set into a recess of two different depths, with a different clerestory style to C1.
Orangery G1: A larger scheme with a breakfront requiring a larger section steel roof beam to overcome deflection for the greater span.
Orangery G2: Similar to G1 with less width, a deeper breakfront projection and a variation in the style of the windows and doors with a central horizontal bar.
To rationalise the designs, they have been worked to the same pane size/ casement module, with the exceptions of B1 and C2. In most cases this gives base sizes as close as possible to brick dimensions.